
After launching your web service, how do you protect it from overloading? This article will discuss options to protect your services with a common technique called rate limiting.
There are many different reasons why we want to block requests at times. To name a few:
- We want to prevent noisy neighbor problems so those rogue clients generating excess requests won’t cost problems for other clients.
- Bots are hitting our public endpoints stealing data and we want to stop them.
Regardless of the reasons, in this post, we will look into how we can implement rate-limiting to prevent these unwanted scenarios from happening.
We will cover three topics:
- What do we use to we identify the clients;
- Some must-known rate-limiting algorithms;
- Scale up with more than one application servers.
Rate Limiting Target
Before even talking about rate-limiting algorithms, we have to know how to identifier the users — who do we put rate limits on?
Rate Limiting Based On IP Address
An IP address is a numeric label that we use to identify a device on the internet. It sounds natural for us to rate the limit on IP addresses.
The question is — Is it possible to spoof the IP address? Well, it is, but it is non-trivial.
For the client and the server to establish a connection, the client and server need to go through a 3-way handshake process:
- The client sends an
SYNpacket to the server to start the connection - The server sends an
SYN-ACKpackage back to the client to confirm that it ready to establish the connection - The client receives the package and sends back another
ACKto start the connection
The problem with step 2 is that if the client initiated a connection with a fake IP address, the network connection cannot be established successfully.
For that reason, spoofing IP addresses is only used for DOS attach, the purpose of which is to bring the service down instead of stealing data. That’s a topic of its own and we won’t cover it here today.
For other legitimate use cases, why don’t we always perform rate limiting based on IP address?
Another limitation with IP addresses is that they are not unique. We have the well-known IPv4 address exhaustion problem. Multiple users can share the same IP address. Users behind the same ISP (internet service provider) can share the same public IP. The same can happen if users are on a VPN. Finally, for mobile users, mobile service providers also have a limited list of known IP addresses.
For this reason, it can be less effective to implement rate limiting based on IP addresses since an IP cannot uniquely identify a single user, but rather a small cluster of users.
Rate Limiting Based on User ID
Other than IP address, we can also consider rate limit based on User ID.
Obviously, this can only be meaningful if the system requires a login. For example, if the user requires login via 2nd-factor authentication, then we can reliably identify the user. But if we have a public-facing API endpoint that does not require user authentication, then this is not an option.
Rate Limiting Based on API Key
For critical services, we can assign an API key to each customer. It is also common to assign a different access rate to each API key, for example, 300 requests per day.
Compared to User IDs, using the API keys imposes more frictions on the users. Therefore, it also only makes sense to certain applications. These applications usually access more valuable data or services, and they usually come with a price tag. Here are a few examples:
- Mapbox API for maps and navigation
- Tinyurl for URL shortening
- Cloud Natural Language API for natural language processing
Rate Limiting Algorithms
In this section, we discuss a few commonly used rate-limiting algorithms, their differences, and trade-offs:
- Fixed Window Counter
- Sliding Logs
- Sliding Window Counter
- Token Buckets
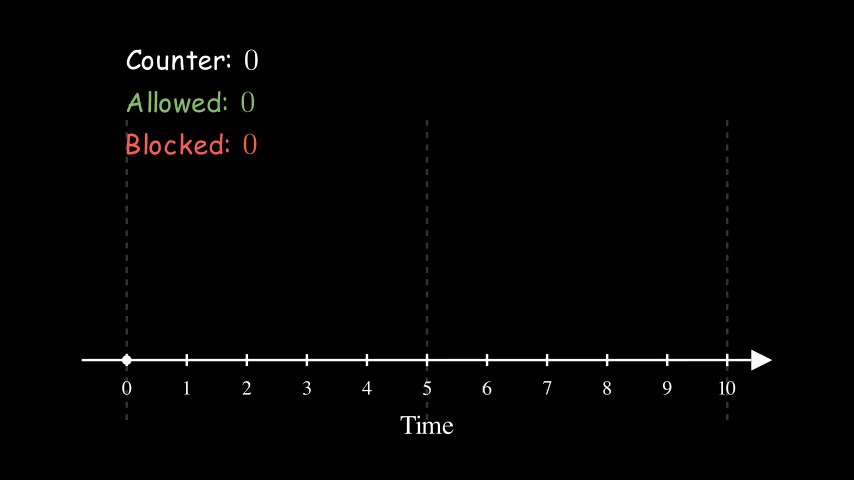
Fixed Window Counter
We keep track of a counter for each client for each time window. We bump the counter whenever er allow a request and block the request if the counter reaches the limit.
Here is an example of 5 requests per 5 seconds. Each box represents a client request. A green box means that it is allowed whereas a red box indicates that it is blocked. At time 5, we reset the counter to 0 as it enters a new time window.
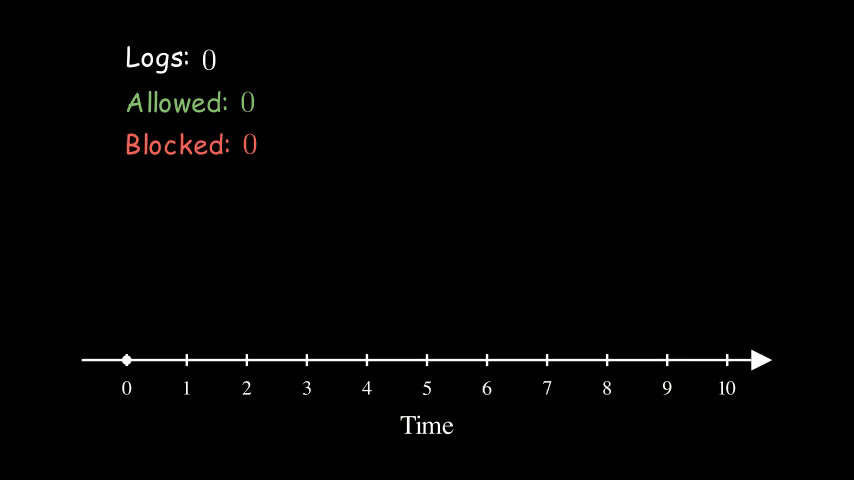
Sliding Logs
Not hard to see, the above Fixed Window Counter algorithm is not very accurate. There are two obvious drawbacks:
- For a client with consistently high requests volume. Requests are likely allowed towards the beginning of a window; blocked towards the end of the window.
- For a client with spiky traffic, we could have a situation where we receive a large number within a short period. For example, if a client makes 5 requests towards the end of a window and makes 5 requests at the beginning of the next window, the server could receive 10 requests (2x) within a short period.
To address that, we can use the Sliding Logs algorithm. Instead of keeping track of the counter, we keep track of a list of timestamps of the requests.
Here is the same example of 5 requests per 5 seconds again. At time 5, the logs counter reduced from 5 to 3 because the first 2 requests have expired.
Compared to the Fixed Window Counter, one drawback of this approach is that it requires more memory. If the requests rate is very high, then it may not make sense to use this approach.
For example, assuming we have 1 million clients, we want to allow each client 1 thousand requests per day. Without considering the overhead of the hash map, the memory it requires to keep track of these requests are:
1 million * 1 thousand * 4 bytes = 4 gigabytes.
Sliding Window Counter
To take advantage of both Fixed Window and Sliding Window Counter, we can use a hybrid method of these two.
Continue with the example from the previous section. We can divide the window (one day) into 24 smaller windows, each representing an hour. Now, instead of having to keep track of 1 thousand timestamps for each client, we only need to keep track of 24 counters.
To check whether we should allow the new request, we need to sum up all the 24 counters and see if the sum is smaller than 1 thousand (the limit).
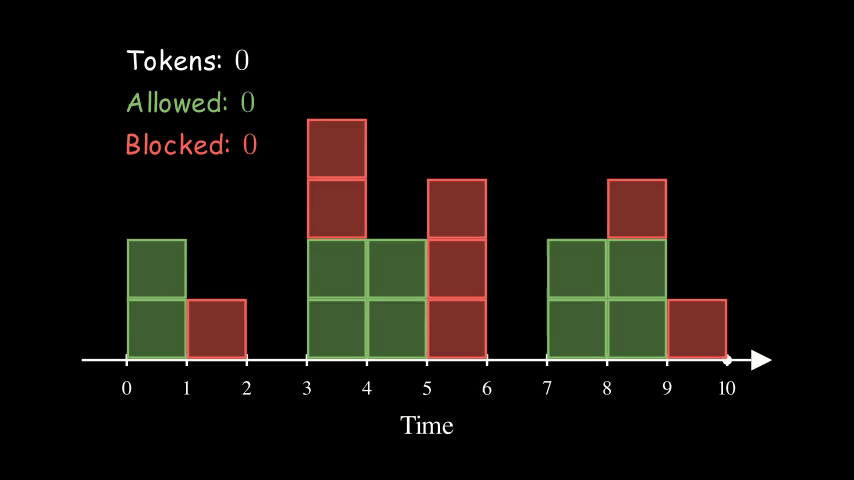
Token Bucket
Token Bucket algorithm is similar to the Fixed Window Counter algorithm above, in the sense that Fixed Window Counter is counting up whereas Token Bucket is counting down.
For each client, we create a bucket with tokens. Every time there is a request, we reduce the token by one. We block the request when there are no more tokens left in the bucket for the given client. In the meantime, the tokens are refilled at some predefined rate.
Here is an example of a bucket being refilled with 2 tokens every 2 seconds. The size of the bucket is 5. Interestingly, the effective rate of this configuration is the same as the other two animations above for Fixed Window Counter and Sliding Log. They are all at 1 QPS (queries per second).

So far, the bucket is never full (with 5 tokens). That’s because we have consistently high request rates. Imagine if the server stops receiving requests for a while, the bucket will eventually get filled up. The size of the bucket essentially controls how spiky we allow the traffic to be.
Overall, Token Buckets algorithm is more flexible. It also doesn’t have the per-defined window and thus it can spread out requests spikes from multiple clients better.
On the other hand, since it requires more writes to update the tokens count, it is more expensive computationally.
Token Buckets algorithm is widely use in the industry. For example, DynamoDB use token bucket for rate limiting read capacity unit (RCU).
Store States
In discussions above, we assume that we only have one application server, and we store all the information in memory. In the previous section, we assume that we only have one application server, and we store all the information in the memory of that server. However, in the real world, this is rarely the case. In this section, we will discuss different options for scaling up when we have multiple servers.
Store States in Application Server
Often, we have a load balancer in front of the application servers. There are various approaches for load balancing. For the purpose of this article, we will discuss two:
- Round Robin
- Sticky Session
For more information about sticky sections, it is well explained in the following AWS documentation: Sticky sessions for your Application Load Balancer. For more information about Round Robin and different variations, “Google — Site Reliability Engineering” book Chapter 20: Load Balancing in the Datacenter has a lot more insightful details.
In nutshell, the difference between these two approach is how the requests are routed. If we have a client making 1000 requests, and we have 10 servers. With round robin, each server would get roughly 100 requests. With sticky session, all 1000 requests from this client would get routed to the same server.
With Round Robin, one approach is to divide the limit by the number of servers. For example, if we want to rate limit the client at 1000 QPS and we have 10 servers, each server can independently rate limit the client at 100 QPS. Now, this won’t give us deterministic results since a request can be blocked by one server, accept by the next server. However, it is a very good approximation and we can still keep the implementation simple.
Alternatively, if we indeed want to keep the counters in sync, we can consider using some distributed message queue, leader-follower architecture, gossip protocol, etc.
With Sticky Session, it is simpler. We can continue to store the counters in the application server since each server ideally is handling requests from a subset of clients.
Store States In External Data Store
Instead of storing the data in the application server, we could also store the information in a separate data store, such as Redis. There are multiple benefits in doing so:
- It is easier to reason about since rate limiting is a separate component.
- If the application server dies, we don’t lose any data. We can more accurately enforce our rate limiting policy.
However, using external storage also comes with trade-offs.
- We introduce another point of failure. What if we have connectivity issues with the external storage? Should we block or allow requests in this situation?
- It can result in some latency increase. Network calls are slower than accessing local memory. On top of that, having multiple servers accessing the same counters, we need to spend more time dealing with race conditions.
Conclusions
In this post, we discussed various aspects of rate limiting.
We introduced different properties that can be used to identify clients: IP Address, User ID, and API key. These are all looking at the problem from the clients’ point of view. But we can also think about the same problem from the servers’ perspective — how much load can the server take before the performance starts to degrade? This is often called load shedding. Here is an interesting post on the subject for those who want to learn more: Using load shedding to avoid overload.
We then discussed 4 rate limiting algorithms, from the simplest Fixed Window Counter to the more sophisticated Token Buckets. For completeness, it is also important to point out another algorithm not covered here, the Leaky Bucket algorithm. It is similar to Token Bucket. For those who are interested in learning more, Wikipedia explain it thoroughly.
Finally, we briefly touch upon approaches we can take to scale up and coordinate rate-limiting efforts across multiple servers.
One thing that is fascinating about working with distributed systems is that there is hardly an absolutely optimal solution. While the topic may look trivial from the surface, there are always trade-offs.
The same goes for the subject of rate limiting. There are multiple options everywhere. It is useful to understand them comprehensively so that we can choose the best options for our applications.
What’s Next
That’s it for today. Thanks for reading and hope that it helps. Do you have to implement rate-limiting in your web servers too? What approach did you use? As always, I would love to hear from you too!
Want to play more with the different types of rate-limiting algorithms? The source code of the simulation above is published on GitHub. Feel free to change the configurations and play with them more.
This article is also available at https://betterprogramming.pub/6114e5df3f3d.